You’ve got an awesome product to sell and the perfect website to boot. Now, all you need to do is set up an online store to start selling. Does this inflict fear and anxiety? Do you feel your tech skills aren’t up to par? If you use WordPress, you’ll be happy to know that starting an online store for your product is super simple.
If you can carve out a full thirty minutes, you will be up and running with a brand-new store using WordPress + WooCommerce. In this guide, we will take you through the entire creation process, discussing what tools you will need and getting you ready to be open for business.
Without further ado, let’s use WordPress to create a store that will showcase your product and your business.
What Do I Need?
We’re glad you asked. To start, you will need three key tools including:
- A name for your online store which will be used as your domain name
- A hosting account or where your store will live online
- An SSL certificate
If you already have an established WordPress website, you may already have your domain name and your hosting account. If this is your first time using WordPress, you will want to choose the perfect domain name that is easy to identify with your products and a hosting account that fits your budget and store requirements.
Some of the best options for hosting when it comes to WordPress + WooCommerce include Bluehost, SiteGround, WP Engine, and more. Do some research prior to getting started to find the hosting that is best for you.
An SSL certificate gives you the ability to accept sensitive information and payment through your online store. This is a requirement for you to accept payment and will cost you around $69 per year.
Getting Started in WordPress
No matter which hosting you choose, the next step is you download and install WordPress. You can find the instructions for installation here. Once WordPress is installed, you are ready to start the WordPress + WooCommerce setup.
If you use Bluehost, which is the most popular option for hosting, WordPress + WooCommerce will already be preinstalled. If you didn’t choose Bluehost, you can follow the instructions here to quickly install WooCommerce to your WordPress.
Once WooCommerce is installed, you can open the plug-in from your WP Dashboard. We will begin the setup process by adding important information such as payments and currency. WooCommerce comes with a quick setup wizard to make it easy for you to set up your store. Follow the onscreen instructions that will look like the image below:
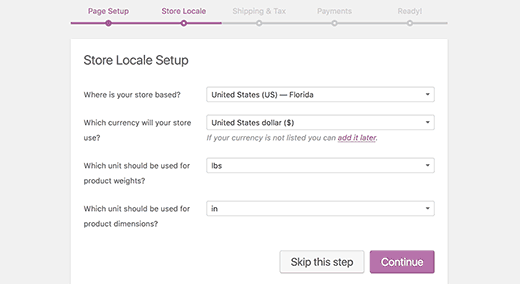
(Source: WPBeginner)
Fill in where your store is based, the currency you will use, the weight units and units for product dimensions. Continue on to the next page which will give you various options for shipping and tax.
Finally, you will reach the payments page where you can choose which payment methods you wish to use for your store. WooCommerce comes standard with PayPal and Stripe. You can install other methods later after the initial setup is complete.
After you choose your payment methods, your setup is complete. Congratulations!
Putting Product in Your Store
What is a store without products? Once you exit the setup wizard, you can navigate to the WooCommerce area of your WP Dashboard and open the Products link. By clicking “Add New” you can start adding your first product to your store!
- Create a product title and description. Make sure you are using keywords to describe your product to help with your search engine optimization.
- Create product categories. You will then place your product in a product category of your choosing to help sort your products.
- Fill in the Product Data Box. By scrolling, you will find the WooCommerce Product Data box where you can input prices, shipping, and more.
- Upload product photos. Finally, you will find the area to upload images and additional images for the product gallery.
Take a look at your product and make any changes if necessary. If you are ready to see your product live, you can publish your product. With that, your first product is live in your new WooCommerce store! Continue adding products until you are happy with what you have.
Extras and Customization
If you have an established WordPress website already, you may have already chosen your theme. If you haven’t, you can visit the Appearance and Customization tab in your WP Dashboard to customize your WooCommerce store. You can go further by adding contact pages, about pages, and more if you haven’t done so already.
You can also find additional tools for your online store by installing WordPress plug-ins. There are literally thousands available to help you customize your store into exactly what you envision it to be. You can see a complete list of these plug-ins here.
As you can see, it is simple to get started with your new WordPress + WooCommerce store, no matter your level of WordPress expertise. By completing a few setup tasks, it’s as simple as adding your amazing products. We’re sure your customers are patiently waiting for those doors to open – let’s go!
If you are new to WordPress and want to learn more, check out this The WordPress Basics You Need To Know First.