What is all this “optimizing your WordPress site” about? I’m glad you asked. As the proud owner of a new blog or website using WordPress, you may be wondering how you find those dedicated audience members and followers. You may be wondering how your website is measuring up next to the competition. How does Uncle Google rate your website on the search engines? All of this and more can be answered through SEO.
SEO or search engine optimization is oftentimes looked over, especially on websites that have been established for some time. But listen, I’m here to tell you that SEO is critical to the success of your website, no matter what you’re using it for.
You don’t have to navigate the crazy world of SEO alone. With WordPress, you have the option to install and use the Yoast plug-in, the best SEO assistant for your WordPress project.
Starting with the absolute basics, let’s get started on optimizing your WordPress site the easy way using the Yoast plug-in.
Install the Yoast Plug-In
To get started, you will need to download and install the Yoast plug-in. You can follow these simple steps below:
- Go to your WordPress dashboard and then “Plug-ins”, followed by “Add-New”.
- You can search by typing “Yoast” to find the plug-in.
- Simply click “Install Now” to begin the installation process.
- If a pop-up appears, you will need to click “Yes” to give the plug-in permission to be downloaded.
- Once the plug-in is installed, the last step is to click “Activate Plug-In”.
Once the plug-in is activated, you will be ready to go!
Yoast Configuration
Don’t be nervous at the word configuration. Yoast is built to be easy to use and offers an easy way to start the configuration of your new SEO assistant. On the left-hand side of your dashboard, you will find an “SEO” option which will take you to your Yoast SEO dashboard. Once there, you can start the “Check SEO Configuration” wizard, brought to your especially by Yoast for beginner users.
According to Yoast, the configuration wizard will take you through twelve steps that will configuration Yoast’s general settings to your unique website. The wizard will ask you questions including:
- What kind of website do you have?
- What are your social profiles?
- How many people are publishing content on your site?
The wizard will also give you tips, show you how to optimize your page title and more. It’s a great tool for setting up your new SEO plug-in and I highly recommend it!
What Everything Looks Like
If you have never written a blog post or content on your website, that’s a great place to start. If you have, you can still use the Yoast plug-in to optimize your current copy. When you open your post, you can scroll down and see the Yoast plug-in underneath your content.
If you are starting with a blank slate, it will look something like this:
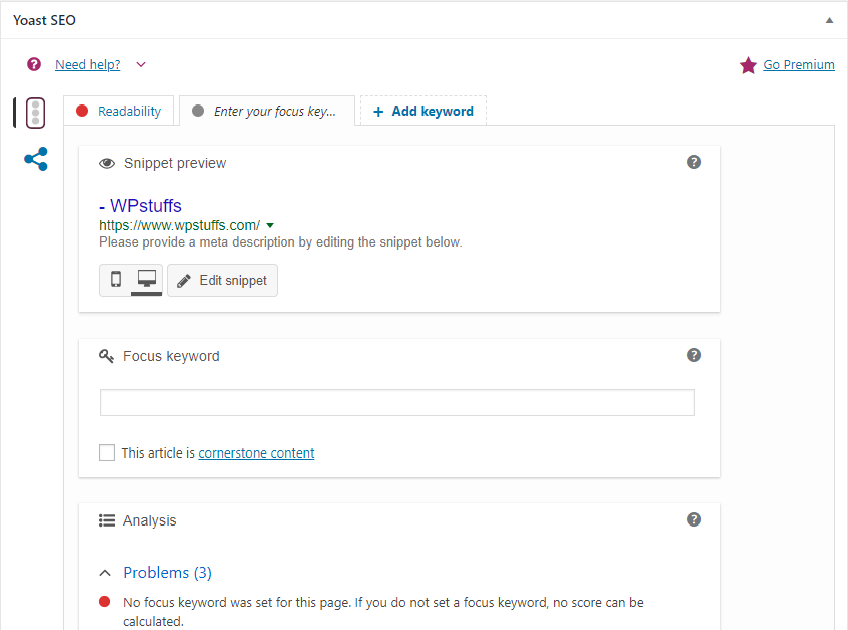
You will see a snippet preview which, if you click on edit snippet, will take you to an editor for your SEO title, slug and meta description. You can also click on the mobile or desktop buttons next to edit for more options.
Next, you will see the focus keyword box where you will enter the keyword you wish to optimize your content for. Finally, you will see the Yoast analysis box which will give you pointers on what needs changing, what needs improving and what looks good.
Now that you are familiar with the overall look and feel of Yoast, it’s time to start optimizing your WordPress site’s first post (or hundredth).
Optimizing A Post
For the sake of understanding, let’s use this blog post as our example. Starting with a blank slate, I have entered “optimizing your WordPress site” as the focus keyword on a completely blank post. You can see the SO analysis so far, below:
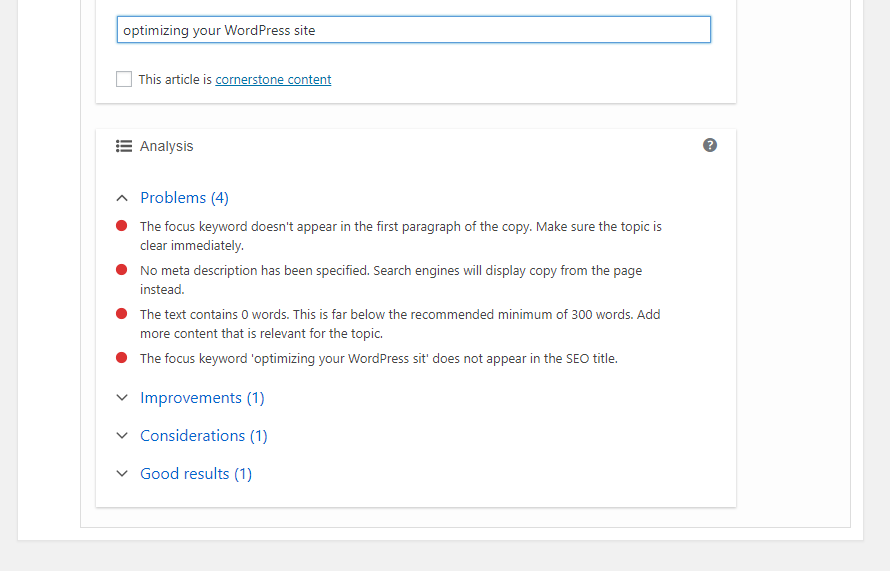
The focus keyword is placed in the focus keyword box and the Analysis section lists out all of the current problems with the SEO on the post. Each down arrow next to problems, improvements, considerations and good results can be clicked to show each section in more detail.
For these problems, we will want to:
- Make the focus clear. The focus keyword should be used at the start of the blog so the audience understands what the post is about.
- Create a meta description. When your audience sees your result on Google, the meta description will help them to decide to click. You should use the focus keyword in here as well.
- Add at least 300 words. To rank in Google, you will want at least 300 words, plain and simple.
- Create an SEO title. Your post title will need to include a title that is optimized with the keyword to get the best SEO rating.
If you open the improvements, you will see other changes you can make as you start creating your post. Some of these options will be adding photos, internal links (links to your website) or external links (links to outside pages) and Yoast will also alert you if you have optimized another post using the same keyword before, something you want to avoid.
Optimizing your WordPress site using Yoast will look something like this once you take the time to follow the tips:
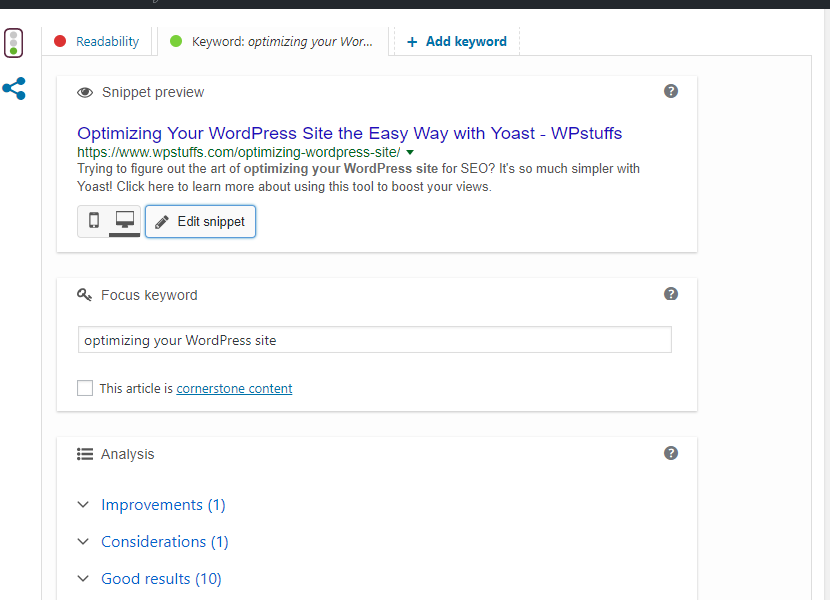
When it comes to Yoast, green means good to go! Not too bad, right?
There is so much more to SEO than one plug-in. However, Yoast can help you improve your on-page SEO fast and easy every time you post. Optimizing your WordPress site doesn’t have to be impossible. By following these steps to install your plug-in and then Yoast’s steps to improving your post, you will be skipping Google pages in no time.