Are you a blogging newbie?
You’ve come to the right place. With as much screen time as our eyes seem to take in each day, it seems obvious that blogging is a way to be heard by the masses. Blogging has been a useful way to share your thoughts and ideas on the internet for many years now, with WordPress hosting the most. However, the term blogging seems to scare some of us away who are not as computer savvy as we want to be.
There is good news. You have found yourself here, reading this guide made for blogging beginners on basic WordPress setup. The better news? You can do it right now. Depending on your level of know-how, a basic WordPress setup can take from 20 minutes to an hour. All you need is some cash flow (although not a fortune) and an idea.
Let’s get into it.
Create a Strategy
Listen, before we get technical, you will want to have a clear and defined strategy for your blog. If you haven’t created a strategy, let’s whip something up now. Grab a piece of paper and brainstorm by answering these questions:
- What will my blog’s content be about?
- Who will be reading my blog?
- What will the blog’s name be?
- What type of content will I be posting?
Are you blogging about your travels? Maybe you are blogging about parenting or fashion or dogs wearing hats. Whatever your content, you will want to be able to portray that through your blog, so others can enjoy poodles wearing sombreros too.
You can also start thinking about how you want your blog to look and the mood you want to set for the reader. Take some time on this step and truly define what it is you’re trying to say and exactly how you wish to say it.
Mark Your Domain and Grab Your Hosting
Basic WordPress setup starts with a domain. Your domain name says a lot in a few characters. The domain is the web address of your blog. For example www.google.com or www.wpstuffs.com. Your readers will be able to find your needle in the haystack using this name. Prior to choosing the perfect domain, you will want to grab some hosting for your blog, the place where it will live.
There are various hosting websites such as GoDaddy, Bluehost and Dreamhost, each with their own features. Most hosting will cost up to $10 per month, depending on the type of hosting you choose. When you choose, you will want to sign up through the website, choose the hosting you desire, make your payment and follow the simple instructions on-screen.
During the process, you will be asked if you wish to purchase a domain name or use a domain that already exists. If you have purchased one prior and wish to you it, you can do that. Some hosting websites such as Bluehost will give you your domain name for free.
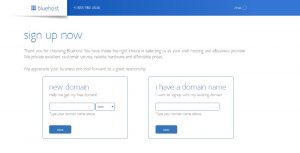
(Example of Bluehost Sign-Up)
Once you have gone through the steps to sign-up on your hosting website, you will receive further instructions by email. Oh, and congratulations – you are the proud parent of a new domain.
Install WordPress
Basic WordPress setup and installation isn’t hard. When we start using fancy words such as “install” we start to sweat. However, installing WordPress is second nature to pretty much all hosting websites nowadays. Since the installation process will vary depending on the hosting website that you choose, you will want to check out instructions for your hosting site. Linked below, you will find instructions for installing WordPress on the top hosting websites on the net.
If you follow the instructions, it will only take a few minutes to install WordPress on your hosting website. Doing it this way will give you greater control over your blog and easier access.
Make it Pretty and Responsive
You can now let out a sigh of relief because the gritty part is complete. Now, it is time to create a blog design that inspires you. You will want to choose a theme for your blog that gives it the look and feel that you wish your content to convey. Themes come in two halves, including the framework or the robot part and the child theme or the pretty part.
It isn’t as easy as choosing a nice color layout. You will want to choose a framework for your blog that lays a nice, solid foundation for the speed and mobility or responsiveness of your blog. Otherwise, those that read your blog on their mobile may be disappointed. The most popular is the Genesis framework that is great for any blog. You can purchase the Genesis framework online and download the file to use in the next step.
The child theme is the pretty part and perhaps the most fun part of the basic WordPress setup. WordPress offers many different themes that are fully customizable to fit your design style and brand. Better yet, most of them were created with responsiveness in mind and some are even free to use. Here are a couple favorites:

(Source: WPBeginner.com)

(Source: WPBeginner.com)
Once you choose a theme, you will need to log into your WordPress to install it and begin using it. You can find the right spot by going to the Appearance tab and clicking on “Install Theme”. Earlier when you found your theme, you would have downloaded a .zip file. Under the “Install Theme”, you will upload the .zip file and activate. You will do the same thing for both the child theme and the framework. WordPress will do the rest of the heavy lifting.
Make It Your Own
Hooray! Your blog is up and running. Once your hosting is purchased, your domain name is chosen, and your themes are installed, you are all set to begin customizing your blog to make it your own. WordPress makes this extremely simple and user-friendly.
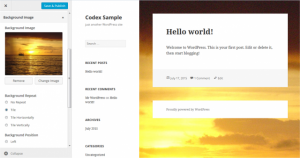
(Source: WordPress.org)
This is an example of what your appearance screen may look like. You can change your blog’s name using the “Site Identity” menu. You can also change the color scheme as well as any header images that you choose to use. You can add pages to your blog and then add a menu so that your readers can navigate. There are also hundreds of widgets or tools you can add to your blog such as contact forms, social media buttons and more.
Continue to make changes until you are satisfied with how your blog looks. WordPress allows you to preview your blog through a button at the top of the appearance screen to check out your work.
If you have made it this far, you are ready to start writing and sharing your voice with the world. The next step is to be inspired, write some amazing blog posts and publish them on your new and shiny blog. Although there is so much more that WordPress can offer your online presence, these simple steps for basic WordPress setup will get your blog up and running in under an hour. Stay tuned for more in-depth how-tos for boosting your blog to the next level.